Cookies

Wednesday, November 20, 2019

The Easiest Way to Mod A Wii for Ripping Backup's (Wii)

THE GUIDE:
RED: MOD YOUR WII USING LETTERBOMB
ORANGE: USING SYSCHECK
BLUE: USING MODMII

Well people get the easy part done and that is making the homebrew channel on the Wii.  After that yes you can run homebrew sort of apps, games, media etc...  Some people not only want to do that but they want to be able to backup of there physical games.   Now for a person like me over the years I've had nothing but issues using USB Loader GX to rip games.  I eventually got it working but some thing I did broke and I had to figure out what was causing the problem. 

Well I spent over 15 hours trying to figure out the problem.  I thought at first the issue was a hardware problem cause when ripping you can here the lens moving having a hard time to get the data to make the backup.  Well I took apart the system and cleaned the lens.  Put it back together again and for some reason a disk would not be able to go in the system something was blocking it.  So again took it apart moved a mechanism out of the way thought that was the problem.  Put together same issue but I decided screw it I'll push it in and see if that solves the problem.  Low and behold it worked and didn't do anything to the disk or drive.  So it was probably something that needed to be maneuvered by doing this method and perhaps others have had the issue as well. 

So back to the system and still USB Loader GX would not backup any game not even Gamecube.  So I was looking over Google with "USB Loader GX freezes while installing".  Well for some reason Google found little to no information with an exact way to solve this problem.  You'd see things like CIOS or Syscheck but not a complete solution to solve the problem. So I decided to look over https://www.gbatemp.net for syscheck information which eventually leading me to more information about a software called ModMii.  Now before reading on and doing this there is warnings out there that say doing this could brick your system and it might be possible if you don't know what your're doing.  So if you don't know what you're doing don't read on and don't do this and don't blame me if something doesn't work.

So here is how it works: Once you have a modded Wii using whatever method and I recommend using the letterbomb method watching the video below.  Just install the mod and bootmii to boot and as cios and prepare your SD card if I didn't mention that in the video.


Now you can use ModMii which can check your SysCheck file once you ran it on your Wii. Installing SysCheck to your Wii is quite simple. Download syscheck from the link below
https://wiibrew.org/wiki/SysCheck ModMii.  Once downloaded move all the files to a new folder called SySCheck in the APPS folder of your SD Card.  Next boot up your Wii go to the Homebrew Channel and run SysCheck and follow the instructions on the screen for it to complete a full scan of the current CIOS's you have installed. The software should ask you if you want to make a file to your SD Card and you should do this in order for this to work correctly. 

Next go and download ModMii from https://sourceforge.net/projects/modmii/.  Next install it and do not launch it cause it'll give you a GUI version which won't give you all the advanced features including information regarding your SysCheck.  If you did its fine I believe in the GUI version you can open a more Advanced version which will open what you need.  If you didn't just press the start button look for ModMii and open ModMii not ModMii (Skin).  It will open like a command prompt and type in "I Agree". 

Next up you'll be given a bunch of commands and what you need is the Syscheck so just type in SU and press enter.  Next all you gotta do just drop and drag the file from your SD Card usually called syscheck.csv into ModMii press enter and it'll do its work.  After that is done it will show you all the files required to make a proper modded Wii to get USB Loader GX and possibly other loaders to work.  So all you gotta do is select "Make Guide and Download Files".  First off the guide will instantly open DO NOT CLOSE THE PAGE! if you do just reopen ModMii do the Syscheck again and redownload the files and Merge it will open the guide again. 

Now that the page is open leave it open go back to ModMii and Open File Location.  A new window will open just drop and drag these files to the root of your SD Card.  So when you got all the files on the SD Card turn on your Wii you can go back and look at the guide that you left open to fully complete your mod setup to use USB Loader GX and other loaders.  If you do this method correctly you should now have a perfectly setup Wii for backing up your library. 


Here is a few things that I don't quite understand but I will let you know in case there is a need for it.  ModMii will give you files for D2X CIOS v8 Final for IOS Slots 249 and 250 that you can install with the Multi Mod Manager.  For me so far its worked and given me no problems and usually when it works you keep what isn't broke.  However other people mention using cIOS: v10 beta52 d2x-v10-beta52 with D2X IOS Installer and you can get information with the following site for that if you need it https://wii.guide/cios.html and they also include installation for CIOS slot 251 which is not mentioned at all for ModMii. 

Another thing is that not all hard drives, flash drives etc... are compatible with USB Loader GX or possibly CIOS's so you'll probably need to look up more information for that and to have things properly work make sure they're in FAT32 cause most homebrew apps use that and it is recommended for GameCube games to work properly.  Just remember if ModMii worked you don't have to use the Wii Guide for CIOS.  Now have fun getting your games on the Wii without having to run back and forth to use your physical disks. 

Saturday, November 2, 2019

Fast Start-Up and Hybrid Sleep Lock Ups or BSOD Fix (Win 10)


Well when I first got this PC a few years ago it doesn't come out of the box with support for Windows 10.  Lots of drivers etc... are a tad old.  But you can still get the machine to run better with disabling two features that caused problems at least for me and maybe you.  My board is the Gigabyte z77x-ud5h which had support to Windows 8.  There has been a few bios updates which are in beta and I believe at this point you won't see anymore support for this board.  At least from what I know is the beta updates have caused a few issues for me.  One being that my PCI-E x1 slots when used would bug up one of my sata ports. 

I have since used the last stable bios update which was made before the release of Windows 10.  Well so far it works and others might experience different issues or success.  Since this I have I tried one of the PCI-E x1 ports and it so far has been working well for over a month.  I haven't tested the other port and that could either be a bugged port or once again maybe do to the beta bios update.

Anyways once you get your machine booted in Windows 10 get those drivers all installed and ready so the machine can properly operate with great success.  Next there is two features that don't run well for me at least on this board and it could be any board that has minimum support for Windows 10 that including mine. 

As far as I know fast startup causes issues for me with either lock ups or bsod's.  Considering the bios already has the feature built-in it could be causing conflicts so if you want you can disable fast startup with in Windows 10 and use your bios for that feature.  To me its some what pointless cause for mechanical drives you might see a small increase for start-up which will probably not be noticeable at all.

For SSD's you'll get a faster start-up which may or may not be noticeable do to the already given ability to be much faster then a mechanical drive.  So at least for me I have seen a small increase but at the same time its given me lock ups and BSOD's so its probably good to just keep it disabled.

To disable Fast Startup

Press and hold the Windows key and press "R"

A new window will open and in there type "control panel"

Press enter and control panel will open in that window click "view by" and choose small icons and after select "Power Options"

Select either "Balanced" or "High Performance".  High Performance I recommend for anyone who has a good gaming PC. 

Next to the left you'll see "change what the power buttons do" click on that and then a new window will open.

Click on "change settings that are currently unavailable" and after that you'll be given the option to uncheck the settings below.  Just uncheck "fast startup"then click "save changes" and things should be good to go.

Next is another feature for at least me has caused problems and that is hybrid sleep.  With this feature it allows your current state to save to memory.  The need for this is that if your computer loses power at any point in sleep it will save to memory so that you can power on your pc and it will boot up where you left off.  Its a great feature however at least for me and maybe others it could cause a bsod or lock up.

To disable hybrid sleep:

Press and hold the Windows key and press "R"

A new window will open and in there type "control panel"

Press enter and control panel will open in there click "view by" and choose small icons and after select "Power Options"

Power Options will open again and to the right of "balanced" and "high performance" there is a "change plan settings" click on that.

Next up click on "change advanced power settings" and scroll until you find "sleep" and click on it.  Under it you should find the hybrid sleep feature.  Click on that and click off and you should be good to go.

Now as far as it has gone for me I haven't had any bsod's or lock ups since.  I did once with the hybrid sleep disabled but it hasn't happened since and I guess I'll have to wait it out but hopefully this will help you out and prevents anymore issues in the future.


Tuesday, October 29, 2019

How to Backup Wiiware and Virtual Console Games with Modded Wii


A lot of you have a Wii and a lot of you enjoy your Wiiware and Virtual Console games.  The main issue is the servers for those downloads may come to an end.  But for those of you who can mod your Wii or use the Dolphin Emulator you may want to be able to back up your games.  Doing so will allow you to use them on a new console if your system ever dies or to use it on the awesome Dolphin emulator which allows you to play your purchased games in higher resolutions.

Of course the reason why I decided to do this blog was cause there is literally no information that I could find which told me how to back up my games.  I did find ones for apps like Netflix or other free apps but of course you don't want that and Netflix won't work at all anymore anyways.  So what you'll need is a Modded Wii.  Modding a Wii is super simple and doing so will allow you to do many things like play homebrew games, emulation etc... 

To mod your Wii just watch this video: https://www.youtube.com/watch?v=KrRy_fpWWqk

After your done watching that video you'll need to get the Yet Another Bluedump Mod from the main GIThub page https://github.com/DarkMatterCore/bluedump-mod.  The files you'll want are in the HBC folder.  Put them in the APPS folder in the root of the SD Card in a folder called YADBM. If you don't have a APPS folder just created one. Next put that SD Card back in your Wii go to the Homebrew Channel and load Yet Another Bluedump Mod.  If you done so correctly you should see the following screenshot.


If you see that then just press "A" to use full hardware access if this doesn't work for you then install the correct IOS using D2X. I selected either IOS 249 or IOS 250 both worked for me however this part can be often tricky and may lead to a bricked system if you don't know what you are doing.  But if you insist in doing this then continue.

A guide for installing IOS 249 and 250 can be seen here: 

At this point it will allow you to either select your SD card or USB for USB Flash or External Hard drive.  I'm not sure how to use the USB and it shows that it has failed.  Not sure why it failed could be that I need yet again another IOS to work with it or its a bug.  For this however we will use the SD Card.  So it should default to SD Card automatically if the USB failed if it hasn't you should be given the option to select either or.  

So after it selects the SD Card you should see the following options.


Now hold your Wii Mote like an NES Controller and pressing "Right" on the D-Pad select Installed Channels by Pressing "A".  If done you should see all of your WiiWare, Virtual Console games and homebrew related apps.  We will of course be ignoring the Homebrew Apps.


Next up your going to want to begin the backup process.  So on the Wii Mote press the "+" button which will then go to the "Content.bin Conversion"  allowing you to start the WAD Backup.  It should almost look identical to the above photo however you'll see the options above change to what you see in the photo below and you must have it look like that in order for this to work.


Now press "A" on any selected game.  You'll have options for "FakeSign" and "FakeSign TMD".  Now I believe you'd want to select these options if you plan on backing them up to another Wii unsigning would make the app not work on another Wii as far as I know.  You'll also be asked if you want to select the region unless you're moving just press "B" but if you are then just select the region you prefer to rip it to. 

If you plan on moving your WAD's to Dolphin just press "B" for all options or you'll be prompted with a error message "This was not signed by Nintendo".  You may still be able to play the game but I know that it can bug up if you use your Wii Menu which is backed up by BootMii.  It may not break anything as far as I know you just need to restart the emulator to play again but yes just make sure all WAD's are unsigned for Dolphin.

The image below shows a successful backup of a Virtual Console game.


Now you should be prompted with "WAD dump complete!".  It should show where your files have been backed up.  It should be in a folder called YABDM folder in the root of your SD Card also remember that its not the one in the APPS folder.  From there you move those WADS to your Dolphin roms folder or put on another SD Card for a new modded Wii.  For installing WADS on a new Wii I recommend using a program called Multi-Mod-Manager.  Remember for a new Wii use Fake Signed WADS mentioned above. 

Now you have your WAD files backed up and they should successfully run.  If they don't try both methods for Signing your WAD's and see what works.  For this tutorial I used my WADS for the Dolphin emulator and all my WAD's worked perfectly.  As for using on a new Wii I have not tested.  I hope you enjoyed this guide but please use this as a guide for your pleasure and not to use on somebody else's console for illegal use. 


Sunday, October 20, 2019

Rename Multiple Files With Bulk Rename Utility (Windows)


Okay well this is guide for anyone who has had issues with the Windows 8 to 10 back up utility.  When you turn on the back up utility for Windows 8 to 10 you have to turn on File History first.  To restore your files from a current back up on a drive you must first turn on file history from there go back to back up click more options and click restore files from back up.  This I did not know and I ended up messing up my current back up.  So what was left were all my files with an ugly UTC stamp.  Example being at the end of the file before the extension ends with something like this "(09_07 05_13_23 UTC)". 

So what ends up happening is if some of your files are save files for games or applications in general or anything it will not open properly do to the stupid UTC stamp.  So in this tutorial I show you how to rename all your files easily.  Now notice I did not say quickly and that is cause yes it will help speed up the process but depending on all your backed up files in millions of backed up folders you will need to do this for *****EVERYTHING!!!!!*****.   Now yes I had to say this loudly cause its a pain in the butt but it also saved me some space getting a rid of stuff I did not need but you may lose some important stuff if you hate having to do this process. 

There maybe an easier way of having the software find all the files with the UTC stamps.  I found however that some of the files had a different date for the UTC stamp and yes I forgot to mention that the date is what's in the UTC stamp if you did not yet notice that.  Well doing this is quite simple first download Bulk Rename Utility from https://www.bulkrenameutility.co.uk/Main_Intro.php.  Next install and open the program.  Once opened select everything you see in the screenshot below in Remove which is highlighted in RED in the software.  Uncheck Add, Auto Date, and Numbering.   Where it says words put the UTC stamp in its place for example (2019_09_07 05_13_23 UTC) don't forget your UTC stamp is obviously different.

(CLICK TO ENLARGE)


Next select all the files you want to rename by pressing and holding CTRL followed by A.  To rename all the files you selected press and hold CTRL followed by R.  You may get prompts to continue if you think you're doing something right just press "OK" to continue.  If you want to not see the prompts just click the disable button the moment a prompt comes up.  Well if you've done everything correctly your files should now be renamed to their original format without that crummy UTC stamp. 

Wednesday, September 25, 2019

MoHo (GAME).... Somewhat Fix for Windows 10


Well I've wanted this game forever.  I do own the PSone version which was the only one released here in North America as "Ball Breakers".  Apparently the PSone version didn't fare to well with the audience.  I hadn't played that version but I know that the graphics would be low res do to the PSone being a 32bit system.  The game did get released for Dreamcast and PC as MoHo and were only released in PAL (Europe) regions.  There was going to be a release in North America for Dreamcast once again as Ball Breakers but it got cancelled.

The Dreamcast version had better textures and looked great it supported 480p as to the PSone version being 240i.  The PC version on the other hand can support higher resolutions and I have tried 1920x1080p with success.  The only issue here is that the game runs at 16bit instead of 32bit but don't let that be misleading as the game still looks fantastic.

In this game you're a robot of sorts thrown into arena's where you must complete different tasks to beat the arena.  The very first one has you collecting these gold statues and once collected you beat that arena.  The next arena has you battling through AI controlled competitors to get to a finishing line and you must get there before they beat you to death.  Anyways now you know that this a game all about competition.

As you can tell this game is great including when you can play against a friend for local play.  But this game does come without a hitch and that means a glitch... oh I rhymed.  Anyways yeah this game has trouble running but it doesn't mean its not playable it just means it takes time to get this game to load.  By this I mean you must do many different things to get this game up and running.

So I recommend getting the Borderless Gaming tool from: https://westechsolutions.net/sites/WindowedBorderlessGaming/

Now lets put the CD-Rom for MoHo in the DVD Drive and run setup.  Of course running install from the Autoload software may not run.  Well this is an easy fix just open the PC explorer go to the MoHO disk drive and click setup.  From here I would either recommend installing on the default C: as C:\MoHo and you might have a better chance of this game running.

I have it installed in the Program Files (x86) which I do not recommend considering how old this game is.  Yes it worked for me but it could lead to more glitches.

Next step lets open Borderless Gaming and get this game running.  Once Borderless Gaming is opened lets open MoHo as well.  Once you have go back to Borderless Gaming and you should see the executable in the left side of the screen as seen here:


As you can see on the right side MoHo is under favorites where you should add it so the game runs indefinitely fullscreen without issues... well don't forget there is glitches still.  Anyways on the left side where MoHo is just right click it and add to favorites.  Now the game is in your favorites and from here we'll add some fixes to get this game running in fullscreen this also includes the FMV videos that could possibly have issues.

So here were going to right click on MoHo under favorites and click on everything that you see check marked in the image below.  The *Always On Top feature may not have to be selected but I thought that if anything interferes the game may not load.


Okay well now we have completed the fix for this game... well somewhat glitchy fix.  So the problem for this game now is that for some reason the game may crash or not load properly.  So a few things I recommend is to go to video setup with in the games menu settings before the game launches and select the resolution you want then press okay.  I'd recommend doing this each and every time you plan on running the game.

Next up I wouldn't recommend using a controller at least not the Xbox One controller.  I was able to play at least one level with the controller and upon beating the level it crashed to the desktop.  If you must use a controller try using one of those controller emulators like JoyToKey which may or may not solve the problem.  Also using the controller settings within the game is bugged any how so you have to use the default settings to use the Xbox One or other controllers anyways.  If you want to use the JoyToKey feature do not have the controller on before running the game or the game will auto enable the controller.  Turn on the controller only after you have the game running.


Do not run overlays or you just might not get the game to launch past the FMV videos.  If you plan on video capturing I'd recommend doing it while playing the level at start and end of the level.  This game has issues with resolutions do to age.  The menu runs at 480p while game itself runs at the resolution selected which may cause an issue with capturing and leading to the game crashing and possibly causing video encoding issues.

You may have better chances using a No CD patch but I don't know if that is recommended either.

If at all none of these solutions fix the crashes you can restart both Borderless Gaming and MoHo and if it still crashes try restarting the computer.  If you're still having issues try changing the resolution to a lower resolution and then going back to 1080p or higher after.

As far as I know this game may crash at anytime.  It sucks however the game does save but if it crashes after a certain level you may have to do it again :/.

Well here is some screens of the gaming running to show that it does run even though its a buggy mess.


Sunday, August 4, 2019

Ninja Blade Black Screen Fix (PC)


Not that I would totally recommend playing this cause its a broken mess however there is one issue that a few people have had while playing this on Windows 8 and higher.  As far as I know there has been no solution to this issue until I just found out today clumsily by pressing 3 buttons I usually don't press unless a game is totally locked up.

Okay so some of you or maybe most of you have had that black screen issue while playing this.  I would pretty much just alt-tab out of the game and close it and probably never start up again if I couldn't fix the situation.  Well instead of that I pressed ctrl+shift+esc which usually in combination opens taskmanager. Well it did but for some strange reason the game starts and the FMV plays.  However all you really need to do is press the "esc" button and the video starts.  If it pauses alt+tab out and click back in and press "esc" again and it will play.

I did notice however you miss the very beginning intro.  I've tried other fixes as well which includes using Riva Tuner to cap the Framerate to 60fps.  You can disable vertical sync and 30fps max.  That may work I just found out after doing this and disabling Riva Tuner the game actually didn't depend on the framerate cap after and the very beginning intro actually starts... Odd but give each method a try until it works for you.

Now you'll probably notice the game has a horrible issue with stuttering which as far as I know can't be fixed.  This is the reason why I'd say pass on this game and if the console version has no issue play that instead.  But if you really want to enjoy this game with steady framerate and less stuttering play at 30fps even cap it with Rivatuner if the FMV problem hasn't been fixed yet.  However if you can put up with this messy game have fun.

When you first start the game you might have an issue alt-tab out close the game and start it up again.  Also you want other fixes please visit https://pcgamingwiki.com/wiki/Ninja_Blade.

Monday, July 8, 2019

Avermedia Extremecap U3 Audio Capture Fix with Recentral


A little while ago I went to go and try to capture some game play using my Extremecap U3 by Avermedia using their capture software Recentral.  It seems as of the new 1903 update Windows blocks the driver.  It will capture video but it won't capture audio.  Sure you can hear the audio just fine while using the software but again no audio capture.

I went to contact Avermedia customer support and they had said for whatever reason Windows is blocking the driver.  Of course I have the email here for you guys to see it also has a direct link to the driver which will solve the issue.  However this may or may not work for you so don't blame me if it doesn't.

Hello Mr./Ms. Eric D Frendo-Cumbo,
Thank you for choosing AVerMedia.
Hi, 1.Please install new software for solving audio issues. https://drive.google.com/open?id=1BV4b_3GtoS147bM3VZ3FUs69ArIj7No
2.During the install process, you may refer to Code 52 issues, code 52*: The driver error code 52 refers to that Windows cannot verify the digital signature for the drivers required for this device. Probably the driver installed on your computer is signed incorrectly.  
https://drive.google.com/open?id=1_qO4sueMVs9zHftHKA1lJxX9fTUqaeWU 
https://www.drivereasy.com/knowledge/solved-driver-error-code-52
 3.After installing the driver, please follow this FAQ process way to disable signature on   your computer setting. 
Best regards, AVerMedia Service Support

For me this driver works and it should for you.  As I'm aware I've seen people have similar issues so I'm kind of baffled why Avermedia has not included this driver on their site yet.

Sunday, June 23, 2019

Sega Rally Revo Setup is Already Running (FIX)


Okay this is an issue that I had today and I found out that I wasn't the only one having this issue.  Well apparently each and every time you go to install the game it puts a temporary file in the documents folder called SegaRallyInstall.txt.  Anytime you disrupt the setup that file remains and when you go to reinstall you get the "Setup Is Already Running" error.  So you'll just need to delete that and you'll be able to reinstall the game.

Tuesday, April 2, 2019

Fury 3 Fix (Win10)


Well I'm pretty sure I had already done this before but today I found that my guide to installing Fury 3 isn't available.  Perhaps I deleted it by mistake or perhaps I was working on it and I didn't like it.  So here is how to get Fury 3 to work on Windows 10.  Perhaps this will work with other versions of Windows.  I have tested this so far with Windows 8 and Windows 10 and had no problems. 

There is other guides on the internet but they don't have the fix to have this working on Windows 8 and perhaps the same issue happens with Windows 10.  There is still one issue that possibly can be fixed but isn't in this guide and that is being able to use the "help" feature.  Help used to be built into Windows but in later versions it was removed and by doing that it breaks it for older games.

Anyways this fix is superbly easy if you know how to install a virtual system using Windows XP using Virtualbox or VMware Player.  If you don't know how to set it up you need to find a guide on the internet and after that come back here.  For this setup I'll be using Virtualbox.

After installing your virtual emulator you'll want to be able to share your main system hard drive with the emulator for easy drop and drag.  For Virtualbox its quite simple just open Virtualbox, right click on Windows XP that you just installed and go to settings.  From there go to shared folders and you can share a whole drive or even just a specific folder and I guess for this you may just want to make a Fury 3 folder on your C: or any drive you like.  From within Virtualbox add the folder from "Shared Folders" and now you'll have access to the folder for easy dropping and dragging and don't forget to click "Auto Mount".


Once you have done this you will now be able to access that hard drive within your emulated Windows XP on Virtualbox.  When accessing the drive from the emulator just go to "My Computer".  The drives may show there with your emulated "C:" drive in the lower window as a network drive.  If it isn't there just click on "Network Places".  Within there you'll see your non emulated drives under different letters but should also give you the letters and name of the folder with in those shared drives.

Next up is the simple part.  Go to install Fury 3 on your emulated drive.  Once complete just drop and drag to your shared drive where you made the Fury 3 folder.  Once that is done we no longer need the virtual emulator.

This may work out of the box for Windows 7 and lower but for Windows 8 and 10 you'll probably have to edit a file to get it working perfectly.  So go to where you have the game installed and look for the SYSTEM folder. For me I put it on my D: drive so its located at D:\FURY3\SYSTEM.

Now look for the Fury3.ini file and open it with notepad or another text editor.  Scroll down until you see the following line which will look identical but where I have "?" there should be a driver letter.

[CD-ROM]
CDROMPath=?:\fury3\system\story
startupPodName=?:\FURY3\System\startup.pod
gamePodName=?:\FURY3\System\fury3.pod

Now you may see drive letters which were associated with the emulated Windows XP.  We want to associate your installation with your current version of Windows.  So associate your CDROMPath= to your CD/DVD/Blu Ray drive letter.  For me mine was drive F:.  Next you want to associate where you have Fury 3 installed.  Again for me mine was drive D:.  So after that is done it should look like this but again your letters will be different depending on your setup.

[CD-ROM]
CDROMPath=F:\fury3\system\story
startupPodName=D:\FURY3\System\startup.pod
gamePodName=D:\FURY3\System\fury3.pod

After that is done just click save and exit out of there.  Now open the game and you shouldn't have any errors and be able to play the game perfectly of course without the help feature.  I hope you enjoy playing this hidden gem its a part of my childhood and I'm glad I was able to play it again.


Thursday, March 21, 2019

Whitelist Fix for Playstation TV with Official Sony Firmware (PSTV)


You're looking at this cause you have a PSTV and you probably have a PS Vita game or app you want to use on the PSTV and can't.  Well yes of course I gotta fix for that and no you don't need HENkaku or other mods to get this to work all you need is official Sony firmware.  Also do take note I will not take any blame if your system messes up and also note that you can remove the whitelist patch which I will also discuss.  Also this isn't to play homebrew, emulators, pirated content etc... this is just to play official commercial content.

So first up there is a few things you need which include:

QCMA - https://codestation.github.io/qcma/

PSVimgTools Frontend - https://bitbucket.org/SilicaAndPina/psvimgtools-frontend/downloads/

USING QCMA

Now we begin with the first step.  First up go and open QCMA and then when the icon pops up in the taskbar right click on it and go to Settings.


When that pops up change the settings to what you see exactly in this screenshot.


BACKING UP YOUR PSTV

Next up you're going to want to go to your PSTV but first take out the memory card and then head to Content Manager.  From there scroll down to Backup.  Now if you have QCMA setup properly your PSTV should connect to your PC fine if not try and re-register your PC.  Now all you want to do is press the back up button under Backup Utility as seen in this screenshot.

Now that you have done that it should be quite a small file about 2mb's and of course it didn't take to long.  If you had a memory card in there it would have taken longer and may become an issue in the near future.

USING PSVIMGTOOLS FRONTEND

Alright so now we head on down to psvimgtool frontend.  Open it up and wait for the gui to pop up and click on Easy Installers as seen in this screenshot.


Once you have done that you have a new window select the Whitelister (white list hack).


Next select your PSN nickname (image not shown) and then the backup from your PSTV as seen in the screenshot below.  Yours maybe a different name but if you get lost follow the first 8 numbers example  year 2019- month 03- day 20. 

Click Patch whitelist and it will begin to install and a prompt should come up when its completed.  Once completed make sure the memory card is still not in the PSTV. 

RESTORING PSTV WITH WHITELIST HACK

Now head on back to the PSTV and go to Content Manager, Copy Content and click Restore under the Backup Utility. As seen in the screenshot above when we discussed backing up your PSTV.

Now the restore shouldn't take to long and you'll be prompted to keep the backup and I would keep it for future use for updating games and apps. Right after you've done that then turn off your PSTV.  Once you have turned off your PSTV pop back in the memory card.  Now you should be back at your main menu and now you can test out any PS Vita game and see if it runs.  It should work fine if you did all of the above do note this may or may not work for PSP and PSone games.

UNINSTALLING PSIMGTOOLS FRONTEND

If you're having problems with the psimgtool frontend uninstall it then go to C:\Users\YOURNAME\AppData\Roaming and find psimgtools-frontend folder and delete it.  Reinstall it and make a new backup with your PSTV and follow the guide for psimgtools frontend.

UPDATING AND INSTALLING DLC

Also note that by doing this you will not be able to update or install DLC for your games but there is a fix for that and again its quite simple.  Power off your PSTV take out the memory card after hold the power button until you get to Safe Mode.  Next click on 2. Rebuild Database.  This will completely remove the whitelist hack.  Power off put the memory card back in and by doing this you will now be able to update your games and install DLC.  


After doing this you will want to reinstall the whitelist.  Remember how I said you may want to reinstall the backup?  First turn off your PSTV take the memory card out. Next head on back to Content Manager, Copy Content, Backup Utility and then click Restore.  After restoring once again keep the backup.  Turn off the PSTV again stick the memory card back in and now you can go back to the main menu and use your PS Vita games and apps.

FINAL WORDS

I have done this and I am now able to use Netflix and Wipeout 2048 after fully updating them as seen in the screenshots below.  I hope this guide was helpful to you cause I was extremely happy when I was able to do this and play all my games that I purchased.  Also don't worry about losing your backup just make a new one and run psimgtools again.  Remember if psimgtools doesn't work then follow the step on uninstalling it.  If you have an extra PSTV without the whitelist hack or a PS Vita you can patch your apps that way without having to reinstall the backup.

Sunday, March 17, 2019

0x80070005 Microsoft Store Apps Fix (Win10)


I'm gathering you're here cause you got the error above seen in the screenshot.  Of course with Windows 8 - 10 you probably have come across a few issues involving the Microsoft Store.  I gotta fix for the 0x80070005 error now this may or may not work and this may work with other errors as well.

Remember that in doing this you're responsible for the actions you take.  I will not be held accountable if this messes up your system.

First off your going to want to download an app called Wise Force Deleter which is available here:
https://www.wisecleaner.com/wise-force-deleter.html

Install and run.  After that you want to grab the folders for the certain app that is broken with in Wise Force Deleter.  For me it was the Movies and TV app so it would be under Microsoft.ZuneVideo available at C:\Program Files\WindowsApps.  So if you're having issues with the music app it might be Microsoft.ZuneMusic.  Not sure what other apps might be under but you can do a search on Google to relate your app to one of the folders.

Also make sure you select the right folders or you might mess this up but if you did it may work after the upgrade process.

Anyways if you see more then one folder attached to your app delete them.  Example being Microsoft.ZuneVideo has 4 folders.  So make sure you collect all four folders.  A pop up will come up asking you if you want to delete all sub folders and unlock and delete click yes.  Once you have selected the folders you want to delete click "Unlock & Delete".

Once done the folders should have disappeared. Now for the next step and this will take awhile depending on your hardware and your internet connection.  Download Media Creation Tool from the second link at the following link: https://www.microsoft.com/en-ca/software-download/windows10.  The second link will be the "Download tool now" button.

After that open the Media Creation Tool that you downloaded.  It will start collecting data for an upgrade.  After that click the upgrade button and head on to upgrading your Windows 10 operating system by clicking next.  Once complete go back to the Microsoft Store app and search for the app that was broken and click install.  Once you have done this the app should now go and install and be able to run again.

For me it was the Movies and TV app and as you can see from the screenshot that I took after fixing its running again.


Friday, March 15, 2019

Mario Paint Mouse Cursor (WIN)


Well Mario Day has come and passed.  Today I decided to mess around with mouse pointers for Windows.  I tried to find one for Mario Paint and I couldn't exactly find the perfect one.  So I decided to use the one Nintendo made and make it into a mouse pointer for Windows.  Do note that this mouse pointer I did not make its Nintendo's official pointer I just cropped it and turned it into a pointer for Windows.  This may work for all versions of Windows at least I know Vista, 7, 8.1 and 10 will work.

To use it go to settings select devices then select mouse.  On the far right of the screen you'll see "additional mouse options".  Click that and go to the pointers tab and then browse to where you downloaded your pointer and select it.  Apply and done you now have the Mario Paint pointer.

If you're at all interested in downloading it check out the link below.

https://goo.gl/32r52s

For all things related to Nintendo visit: www.nintendo.com

Friday, March 1, 2019

Actua Soccer 3 fix (Win 10)


Well I purchased this game sometime ago and couldn't get it to work on my system cause it wasn't compatible with Windows 7 and up.  Well the game may of worked out of the box for x86 systems but it wouldn't with x64.  The funny part of that is the game was released on Steam when x64 systems were approved more dominant.  So why would they release it?  Well i'm not hear to answer that question and you can't get the game on Steam anymore anyways but I'm here to give you a fix that will get the game running on x64 systems.

Now of course there is a fix some where on the web unfortunately this doesn't solve a big problem with the game and that is the audio issue.  For some reason the game doesn't have any audio.  Well we will fix that but first we want to get the game running.

Just remember even using these fixes you'll have to ignore the following error and just click retry or use the keyboard click left and press enter.  It doesn't matter either way the game will load.


So first step download dgvoodoo2 from http://dege.freeweb.hu/dgVoodoo2/dgVoodoo2.html you could use nGlide if you wish it may or may not look better. If you also want to use 3Dfx just download nGlide from the following link: http://www.zeus-software.com/downloads/nglide and follow the setup its pretty simple. 

So lets get dgvoodoo2 in the folder by opening the compressed .zip file and drag the files from the MS folder to the root of where the game is installed.  After that grab the dgvoodoo2.cfg and dgvoodooCPL.exe file and drag that into the root of the game folder as well.

If you also want to use 3Dfx just download nGlide from the following link: http://www.zeus-software.com/downloads/nglide and follow the setup its pretty simple.

After you have dgvoodoo2 installed it should look like this:


Next up check mark the following as seen in the screenshots and ignore Glide cause if you have nGlide installed it won't need to be used and you're using the DirectX files from dgvoodoo2 anyways.


(NOTE: You don't have to use the scaling mode to stretch if you don't want to and can be set to anything you want.  You also don't need to Force Anisotropic or Antialasing if you don't want to your system should be pretty powerful in this day and age but if you don't want to you can leave it disabled.)


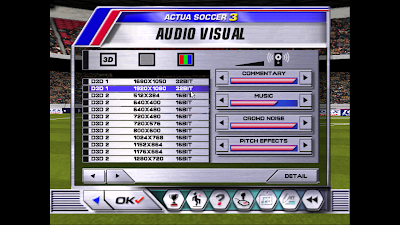
Now once we have that setup load the game and see if it works.  It should load without any issues.  Next were going to want to setup the graphics to make the game look beautiful.  This part here you can either select 3Dfx or DirectX.  Lets go to screen properties in seen in the screenshots below you select any resolution you want.  If you're using DirectX make sure to select anything under D3D 1 and if you're using 3DFX Glide then select that.  For DirectX you'll be able to select 1920x1080p from the menu.  For 3DFX you can force your resolution with nGlide as seen in the 3rd screenshot below and the game will force to 1920x1080 even if you selected 3DFX GLIDE 1024x768 or other resolutions.


Now that you have set that up you pretty much have the game running and you can next up go straight to the game.... oh wait there is one more problem and that is the audio which I explained at the beginning.  Yes next up were going to fix up your audio.  For some reason the game automatically selects a different sound device and you don't hear it through the default sound device.  So we'll have to disable all sound devices except the one you want to use for the game.  Just right click on every device you want to disable and click disable.  So you'll see what I mean in the screenshot below however mine may look different then your setup.  


If its to hard for you to understand right click on the device you want to use and click test.  If you hear the sound that isn't the device to disable.   Again make sure all the devices but the main sound device is set to disable.

Alright well now we want to load the game no more setups lets get straight to it.  Now that you get to the game you can enjoy the beautiful graphics and of course the sound.  The game may not have the video but that is fine the game will load and play fine the video isn't needed for the game I believe its just an intro anyways.


Thursday, February 28, 2019

Saito Games Fixes Update (Win 10)


First off if you haven't heard of Saito Games yet please check out www.saitogames.com they have some great games to check out.  Now that you have purchased your games you'll probably see a problem right away.  Instead of the game playing in fullscreen you see it in a window like the screenshot below.


To fix this you must have Windows Application Compatibility Toolkit you can get right here: https://go.microsoft.com/fwlink/?linkid=2026036.  Make sure to check mark only the Application Compatibility Toolkit (ACT) and ignore the rest.  Click next until the software is completely installed.

Next find Windows Kits from the start button and open the 32bit version of the application compatibility toolkit.  After that right click New Database under Custom Database and select "Create New, Application Fix".  The next part you can do on your own make a file name for the game and the author of the title click next.  Next you'll see compatibility mode at the top of the window just click next until you see compatibility fixes in the same area.  In this window select "force display mode" and "force simple window".  Click next until you see you the "final" button below. 

Next you'll be at the program window just click "save" it has a floppy disk icon at the top.  Next click "file" and then "install".  Now the game should have the fixes installed and you'll see the game run in fullscreen like in the screenshot below ignore the framerate in the upper left.


Now next up is fixing the framerate of Hopmon and Mage Bros.  All of the games available on the site are pretty old titles and were meant to be run on older systems.  So the issues with some games is slow game play do to low framerate issues.  Now thankfully there is a fix for that and pretty much the update to this overall fix.  So if you find your game running slow all you have to do is install dgvoodoo2.  Grab dgvoodoo 2 from http://dege.freeweb.hu/dgVoodoo2/dgVoodoo2.html and install the latest version.

Next up open the compressed file its located in and drag the files from the "MS" folder to the root of the game that needs the fix.  Then in the root of that zip grab the dgvoodoo.cfg and the dgvoodooCPL.exe and again put it in the root of the game.  It should look like this:


Next up open the program and select the following features (Note: selecting 1920x1080 may not do anything but select it anyway cause it doesn't hurt)


Next select the DirectX tab cause we won't be using Glide.


Apply and done.

Next up is a screenshot of before using dgvoodoo2 the framerate is really slow as seen in the upper right its about 12.  It stays like that until you use the dgvoodoo2 fix.  


So with the dgvoodoo2 fix you can see the game now playing at a proper more playable framerate as seen in the upper right its at 60.


Well there you go your favorite games from Saito Games are now fully playable on Windows 10 and this may work with other versions of Windows as well.