Cookies

Thursday, March 21, 2019

Whitelist Fix for Playstation TV with Official Sony Firmware (PSTV)


You're looking at this cause you have a PSTV and you probably have a PS Vita game or app you want to use on the PSTV and can't.  Well yes of course I gotta fix for that and no you don't need HENkaku or other mods to get this to work all you need is official Sony firmware.  Also do take note I will not take any blame if your system messes up and also note that you can remove the whitelist patch which I will also discuss.  Also this isn't to play homebrew, emulators, pirated content etc... this is just to play official commercial content.

So first up there is a few things you need which include:

QCMA - https://codestation.github.io/qcma/

PSVimgTools Frontend - https://bitbucket.org/SilicaAndPina/psvimgtools-frontend/downloads/

USING QCMA

Now we begin with the first step.  First up go and open QCMA and then when the icon pops up in the taskbar right click on it and go to Settings.


When that pops up change the settings to what you see exactly in this screenshot.


BACKING UP YOUR PSTV

Next up you're going to want to go to your PSTV but first take out the memory card and then head to Content Manager.  From there scroll down to Backup.  Now if you have QCMA setup properly your PSTV should connect to your PC fine if not try and re-register your PC.  Now all you want to do is press the back up button under Backup Utility as seen in this screenshot.

Now that you have done that it should be quite a small file about 2mb's and of course it didn't take to long.  If you had a memory card in there it would have taken longer and may become an issue in the near future.

USING PSVIMGTOOLS FRONTEND

Alright so now we head on down to psvimgtool frontend.  Open it up and wait for the gui to pop up and click on Easy Installers as seen in this screenshot.


Once you have done that you have a new window select the Whitelister (white list hack).


Next select your PSN nickname (image not shown) and then the backup from your PSTV as seen in the screenshot below.  Yours maybe a different name but if you get lost follow the first 8 numbers example  year 2019- month 03- day 20. 

Click Patch whitelist and it will begin to install and a prompt should come up when its completed.  Once completed make sure the memory card is still not in the PSTV. 

RESTORING PSTV WITH WHITELIST HACK

Now head on back to the PSTV and go to Content Manager, Copy Content and click Restore under the Backup Utility. As seen in the screenshot above when we discussed backing up your PSTV.

Now the restore shouldn't take to long and you'll be prompted to keep the backup and I would keep it for future use for updating games and apps. Right after you've done that then turn off your PSTV.  Once you have turned off your PSTV pop back in the memory card.  Now you should be back at your main menu and now you can test out any PS Vita game and see if it runs.  It should work fine if you did all of the above do note this may or may not work for PSP and PSone games.

UNINSTALLING PSIMGTOOLS FRONTEND

If you're having problems with the psimgtool frontend uninstall it then go to C:\Users\YOURNAME\AppData\Roaming and find psimgtools-frontend folder and delete it.  Reinstall it and make a new backup with your PSTV and follow the guide for psimgtools frontend.

UPDATING AND INSTALLING DLC

Also note that by doing this you will not be able to update or install DLC for your games but there is a fix for that and again its quite simple.  Power off your PSTV take out the memory card after hold the power button until you get to Safe Mode.  Next click on 2. Rebuild Database.  This will completely remove the whitelist hack.  Power off put the memory card back in and by doing this you will now be able to update your games and install DLC.  


After doing this you will want to reinstall the whitelist.  Remember how I said you may want to reinstall the backup?  First turn off your PSTV take the memory card out. Next head on back to Content Manager, Copy Content, Backup Utility and then click Restore.  After restoring once again keep the backup.  Turn off the PSTV again stick the memory card back in and now you can go back to the main menu and use your PS Vita games and apps.

FINAL WORDS

I have done this and I am now able to use Netflix and Wipeout 2048 after fully updating them as seen in the screenshots below.  I hope this guide was helpful to you cause I was extremely happy when I was able to do this and play all my games that I purchased.  Also don't worry about losing your backup just make a new one and run psimgtools again.  Remember if psimgtools doesn't work then follow the step on uninstalling it.  If you have an extra PSTV without the whitelist hack or a PS Vita you can patch your apps that way without having to reinstall the backup.

Sunday, March 17, 2019

0x80070005 Microsoft Store Apps Fix (Win10)


I'm gathering you're here cause you got the error above seen in the screenshot.  Of course with Windows 8 - 10 you probably have come across a few issues involving the Microsoft Store.  I gotta fix for the 0x80070005 error now this may or may not work and this may work with other errors as well.

Remember that in doing this you're responsible for the actions you take.  I will not be held accountable if this messes up your system.

First off your going to want to download an app called Wise Force Deleter which is available here:
https://www.wisecleaner.com/wise-force-deleter.html

Install and run.  After that you want to grab the folders for the certain app that is broken with in Wise Force Deleter.  For me it was the Movies and TV app so it would be under Microsoft.ZuneVideo available at C:\Program Files\WindowsApps.  So if you're having issues with the music app it might be Microsoft.ZuneMusic.  Not sure what other apps might be under but you can do a search on Google to relate your app to one of the folders.

Also make sure you select the right folders or you might mess this up but if you did it may work after the upgrade process.

Anyways if you see more then one folder attached to your app delete them.  Example being Microsoft.ZuneVideo has 4 folders.  So make sure you collect all four folders.  A pop up will come up asking you if you want to delete all sub folders and unlock and delete click yes.  Once you have selected the folders you want to delete click "Unlock & Delete".

Once done the folders should have disappeared. Now for the next step and this will take awhile depending on your hardware and your internet connection.  Download Media Creation Tool from the second link at the following link: https://www.microsoft.com/en-ca/software-download/windows10.  The second link will be the "Download tool now" button.

After that open the Media Creation Tool that you downloaded.  It will start collecting data for an upgrade.  After that click the upgrade button and head on to upgrading your Windows 10 operating system by clicking next.  Once complete go back to the Microsoft Store app and search for the app that was broken and click install.  Once you have done this the app should now go and install and be able to run again.

For me it was the Movies and TV app and as you can see from the screenshot that I took after fixing its running again.


Friday, March 15, 2019

Mario Paint Mouse Cursor (WIN)


Well Mario Day has come and passed.  Today I decided to mess around with mouse pointers for Windows.  I tried to find one for Mario Paint and I couldn't exactly find the perfect one.  So I decided to use the one Nintendo made and make it into a mouse pointer for Windows.  Do note that this mouse pointer I did not make its Nintendo's official pointer I just cropped it and turned it into a pointer for Windows.  This may work for all versions of Windows at least I know Vista, 7, 8.1 and 10 will work.

To use it go to settings select devices then select mouse.  On the far right of the screen you'll see "additional mouse options".  Click that and go to the pointers tab and then browse to where you downloaded your pointer and select it.  Apply and done you now have the Mario Paint pointer.

If you're at all interested in downloading it check out the link below.

https://goo.gl/32r52s

For all things related to Nintendo visit: www.nintendo.com

Friday, March 1, 2019

Actua Soccer 3 fix (Win 10)


Well I purchased this game sometime ago and couldn't get it to work on my system cause it wasn't compatible with Windows 7 and up.  Well the game may of worked out of the box for x86 systems but it wouldn't with x64.  The funny part of that is the game was released on Steam when x64 systems were approved more dominant.  So why would they release it?  Well i'm not hear to answer that question and you can't get the game on Steam anymore anyways but I'm here to give you a fix that will get the game running on x64 systems.

Now of course there is a fix some where on the web unfortunately this doesn't solve a big problem with the game and that is the audio issue.  For some reason the game doesn't have any audio.  Well we will fix that but first we want to get the game running.

Just remember even using these fixes you'll have to ignore the following error and just click retry or use the keyboard click left and press enter.  It doesn't matter either way the game will load.


So first step download dgvoodoo2 from http://dege.freeweb.hu/dgVoodoo2/dgVoodoo2.html you could use nGlide if you wish it may or may not look better. If you also want to use 3Dfx just download nGlide from the following link: http://www.zeus-software.com/downloads/nglide and follow the setup its pretty simple. 

So lets get dgvoodoo2 in the folder by opening the compressed .zip file and drag the files from the MS folder to the root of where the game is installed.  After that grab the dgvoodoo2.cfg and dgvoodooCPL.exe file and drag that into the root of the game folder as well.

If you also want to use 3Dfx just download nGlide from the following link: http://www.zeus-software.com/downloads/nglide and follow the setup its pretty simple.

After you have dgvoodoo2 installed it should look like this:


Next up check mark the following as seen in the screenshots and ignore Glide cause if you have nGlide installed it won't need to be used and you're using the DirectX files from dgvoodoo2 anyways.


(NOTE: You don't have to use the scaling mode to stretch if you don't want to and can be set to anything you want.  You also don't need to Force Anisotropic or Antialasing if you don't want to your system should be pretty powerful in this day and age but if you don't want to you can leave it disabled.)


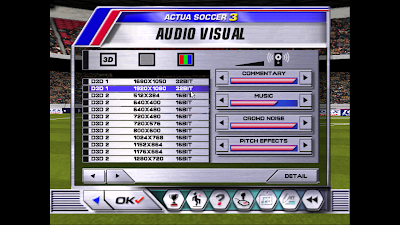
Now once we have that setup load the game and see if it works.  It should load without any issues.  Next were going to want to setup the graphics to make the game look beautiful.  This part here you can either select 3Dfx or DirectX.  Lets go to screen properties in seen in the screenshots below you select any resolution you want.  If you're using DirectX make sure to select anything under D3D 1 and if you're using 3DFX Glide then select that.  For DirectX you'll be able to select 1920x1080p from the menu.  For 3DFX you can force your resolution with nGlide as seen in the 3rd screenshot below and the game will force to 1920x1080 even if you selected 3DFX GLIDE 1024x768 or other resolutions.


Now that you have set that up you pretty much have the game running and you can next up go straight to the game.... oh wait there is one more problem and that is the audio which I explained at the beginning.  Yes next up were going to fix up your audio.  For some reason the game automatically selects a different sound device and you don't hear it through the default sound device.  So we'll have to disable all sound devices except the one you want to use for the game.  Just right click on every device you want to disable and click disable.  So you'll see what I mean in the screenshot below however mine may look different then your setup.  


If its to hard for you to understand right click on the device you want to use and click test.  If you hear the sound that isn't the device to disable.   Again make sure all the devices but the main sound device is set to disable.

Alright well now we want to load the game no more setups lets get straight to it.  Now that you get to the game you can enjoy the beautiful graphics and of course the sound.  The game may not have the video but that is fine the game will load and play fine the video isn't needed for the game I believe its just an intro anyways.